
You keep images, PDF documents and other files in the WordPress media library (Media → Library). From there, you add them to text, set them as a featured image or share them as a download link. This guide explains how to prepare and upload files, add alternative text (ALT) and use them on your website without slowing it down.
In short: images and files in 6 steps
- Before uploading, resize the image (longest side up to 2000 px) and save it as WebP or JPG.
- Give the file a descriptive name: lower case, no accented letters, words separated by hyphens.
- Upload it under Media → Add New Media File.
- In the details, enter the alternative text (ALT).
- Add it to content with the Add Media button, or set it as the Featured Image.
- Save the content (Update) and check how it looks on a computer and a phone.
1. Preparing images before uploading
Large images straight from a camera or phone (5–10 MB) slow the website down a lot. Prepare them before uploading:
- Size – longest side up to 2000 px (full-width images); 1200–1600 px is enough for images in text.
- Format – WebP (smallest files) or JPG for photos, PNG only for graphics with a transparent background. We upload SVGs, as they can contain code.
- File size – aim for up to 300 KB per image. You can compress images with a free tool, e.g. Squoosh or TinyPNG.
- File name – descriptive, e.g.
white-coffee-cup-300ml.webpinstead ofIMG_4587.jpg. The name is visible in the image address and helps with Google search.
When you upload an image, WordPress automatically creates smaller versions (thumbnail 150 px, medium 300 px, large 1024 px), so you don’t need to upload the same image in several sizes.
2. Media library
In the left menu, choose Media → Library. The library shows all uploaded files, from newest to oldest:
- Add New Media File – upload new files.
- Grid / list view – the list also shows the file name, author and the page the file is attached to.
- Filter by type (Images, Video, Documents, etc.) and by date of upload.
- Bulk select – select several files at once, e.g. for deleting.
- Search – by file name, title and alternative text.

3. Uploading files
Choose Media → Add New Media File and drag files into the marked area, or click Select Files. You can upload several files at once. The maximum size of a single file is shown below the area.
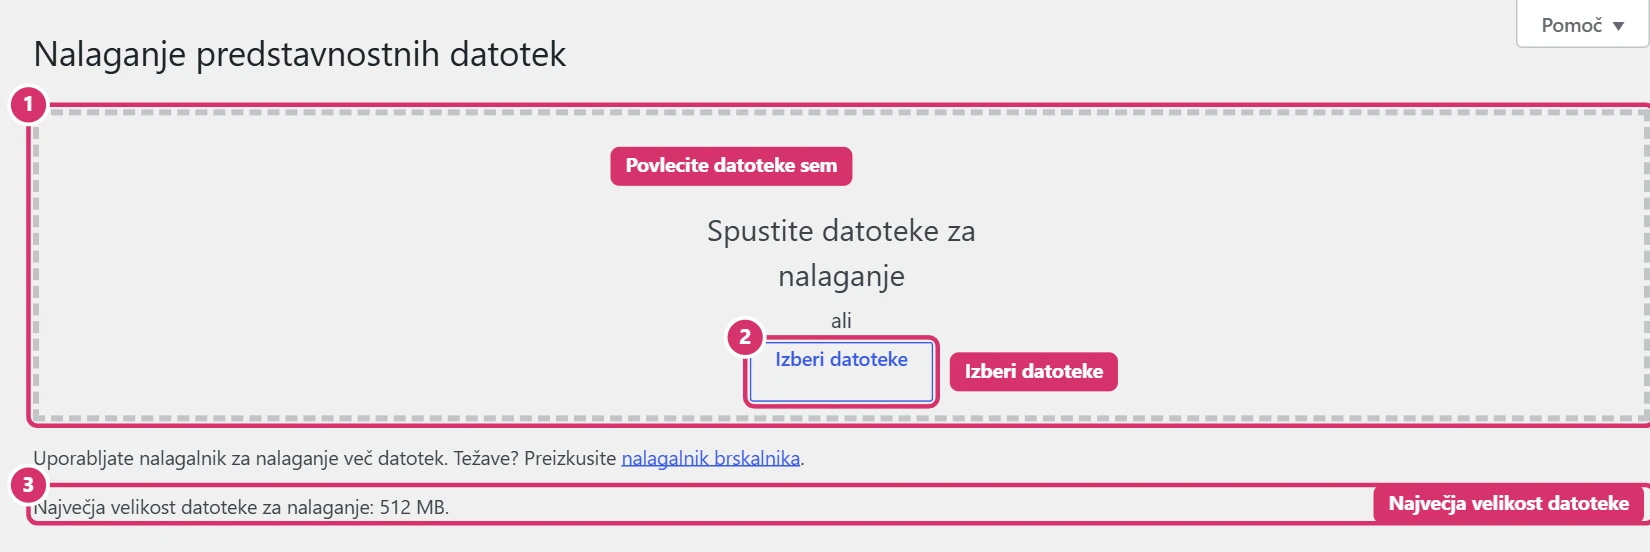
You can also upload files directly while editing content (section 5, the Upload filestab). In that case, the file is automatically attached to the content you’re editing.
4. Image details and alternative text (ALT)
Click an image in the library to open Attachment details:
- File information – date, name, type, size and dimensions. Check here that the image isn’t too big.
- Alternative text – a short description of what’s in the image (e.g. White ceramic coffee cup, 300 ml). Screen readers read it out, and Google uses it in image search. Leave it empty for purely decorative images.
- Title and Caption – the title helps you find your way around the library; the caption can be shown below the image on the page.
- File URL – with the Copy URL to clipboard button, you get a link to the file, e.g. for an email or a link in text.
- Edit Image – crop, rotate and flip the image directly in WordPress.
- Delete permanently – the file is permanently removed from the server (see section 8).
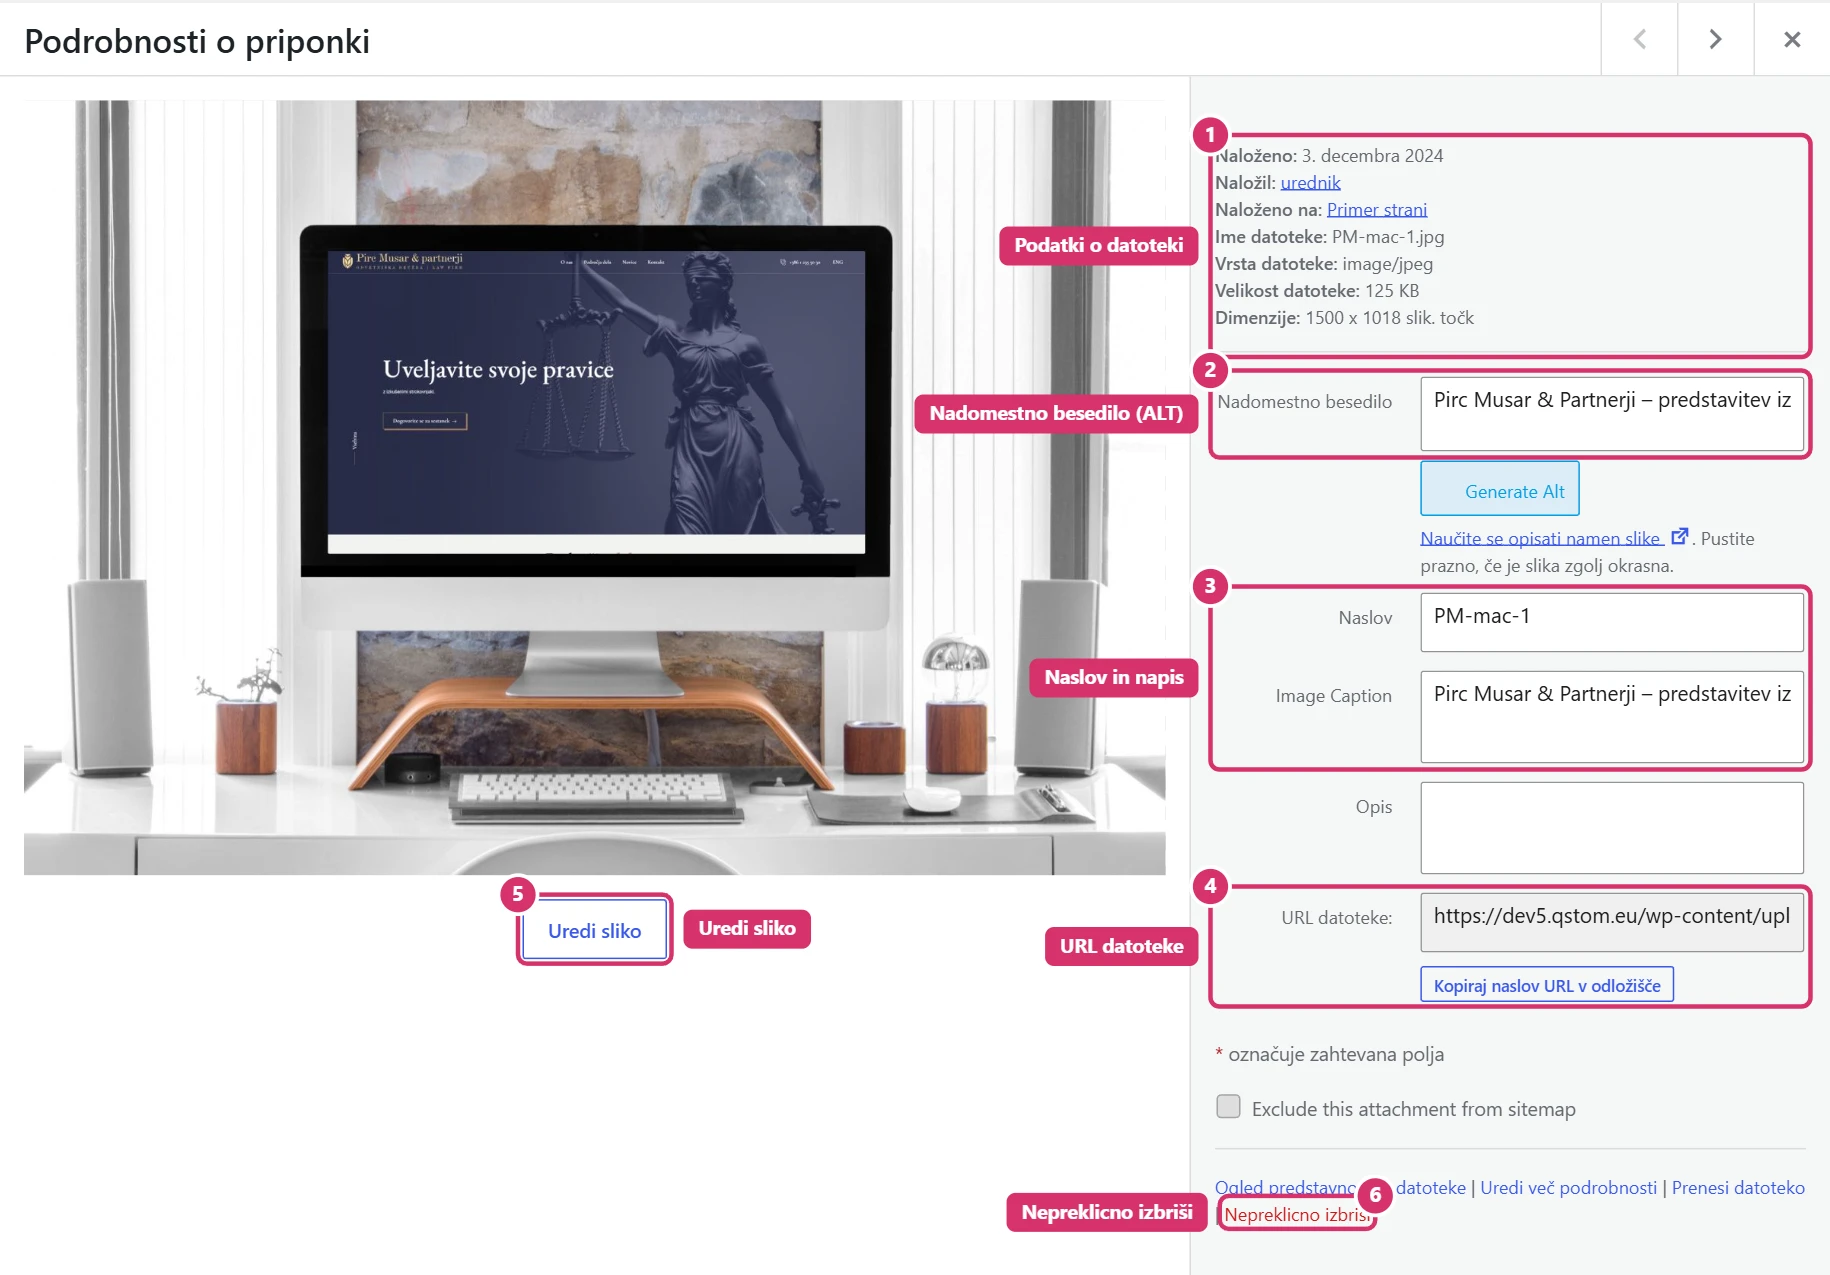
Changes to the details (ALT, title, caption) are saved automatically when you leave the field.
5. Adding an image to text
In the post, page or product editor, place the cursor where you want the image and click Add Media above the toolbar.
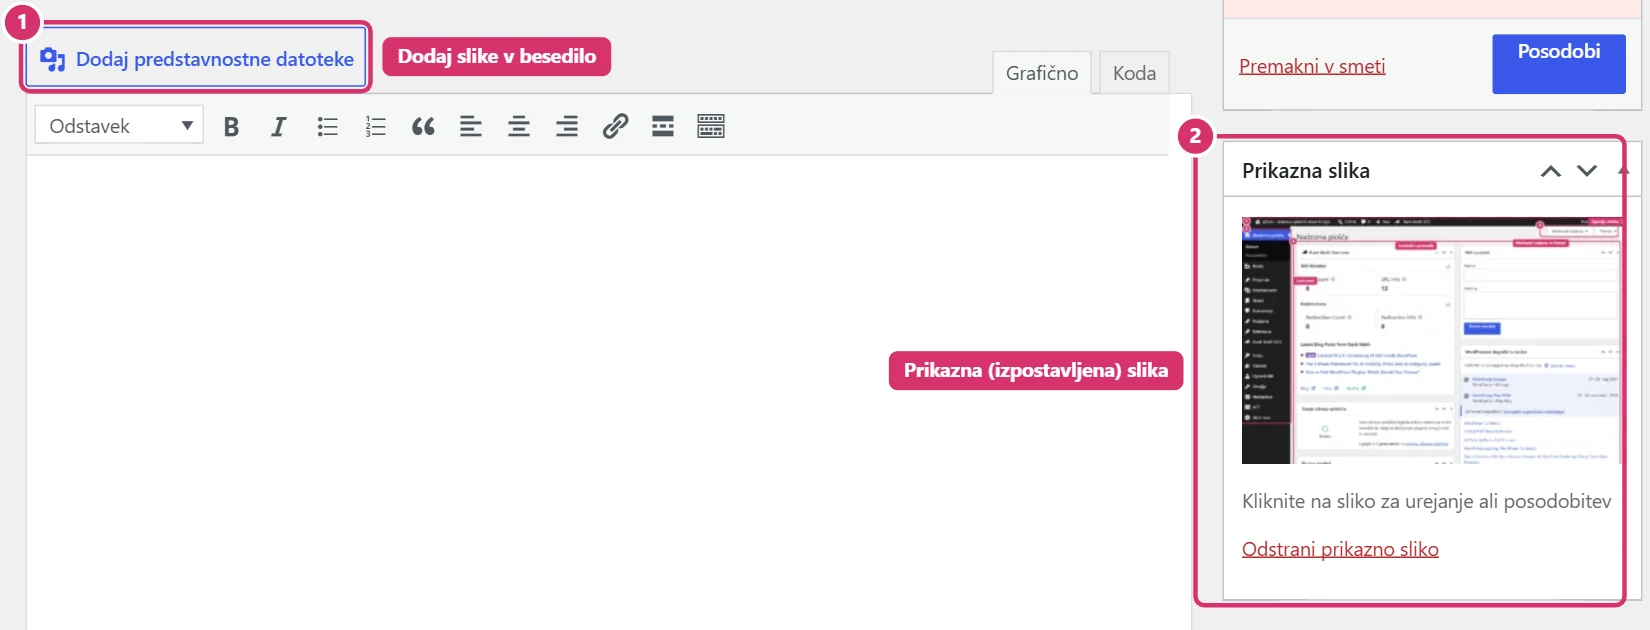
In the Add Media:
- window, upload a new image (the Upload filestab) or choose one in the Media Library.
- Click the image to select it and check the alternative text on the right.
- In Attachment Display Settings choose the alignment (usually None or Centre), the link (None or Media File to enlarge on click) and the size (Large for an image across the text width).
- Click Insert into post and then Updateto save the content.
6. Featured image
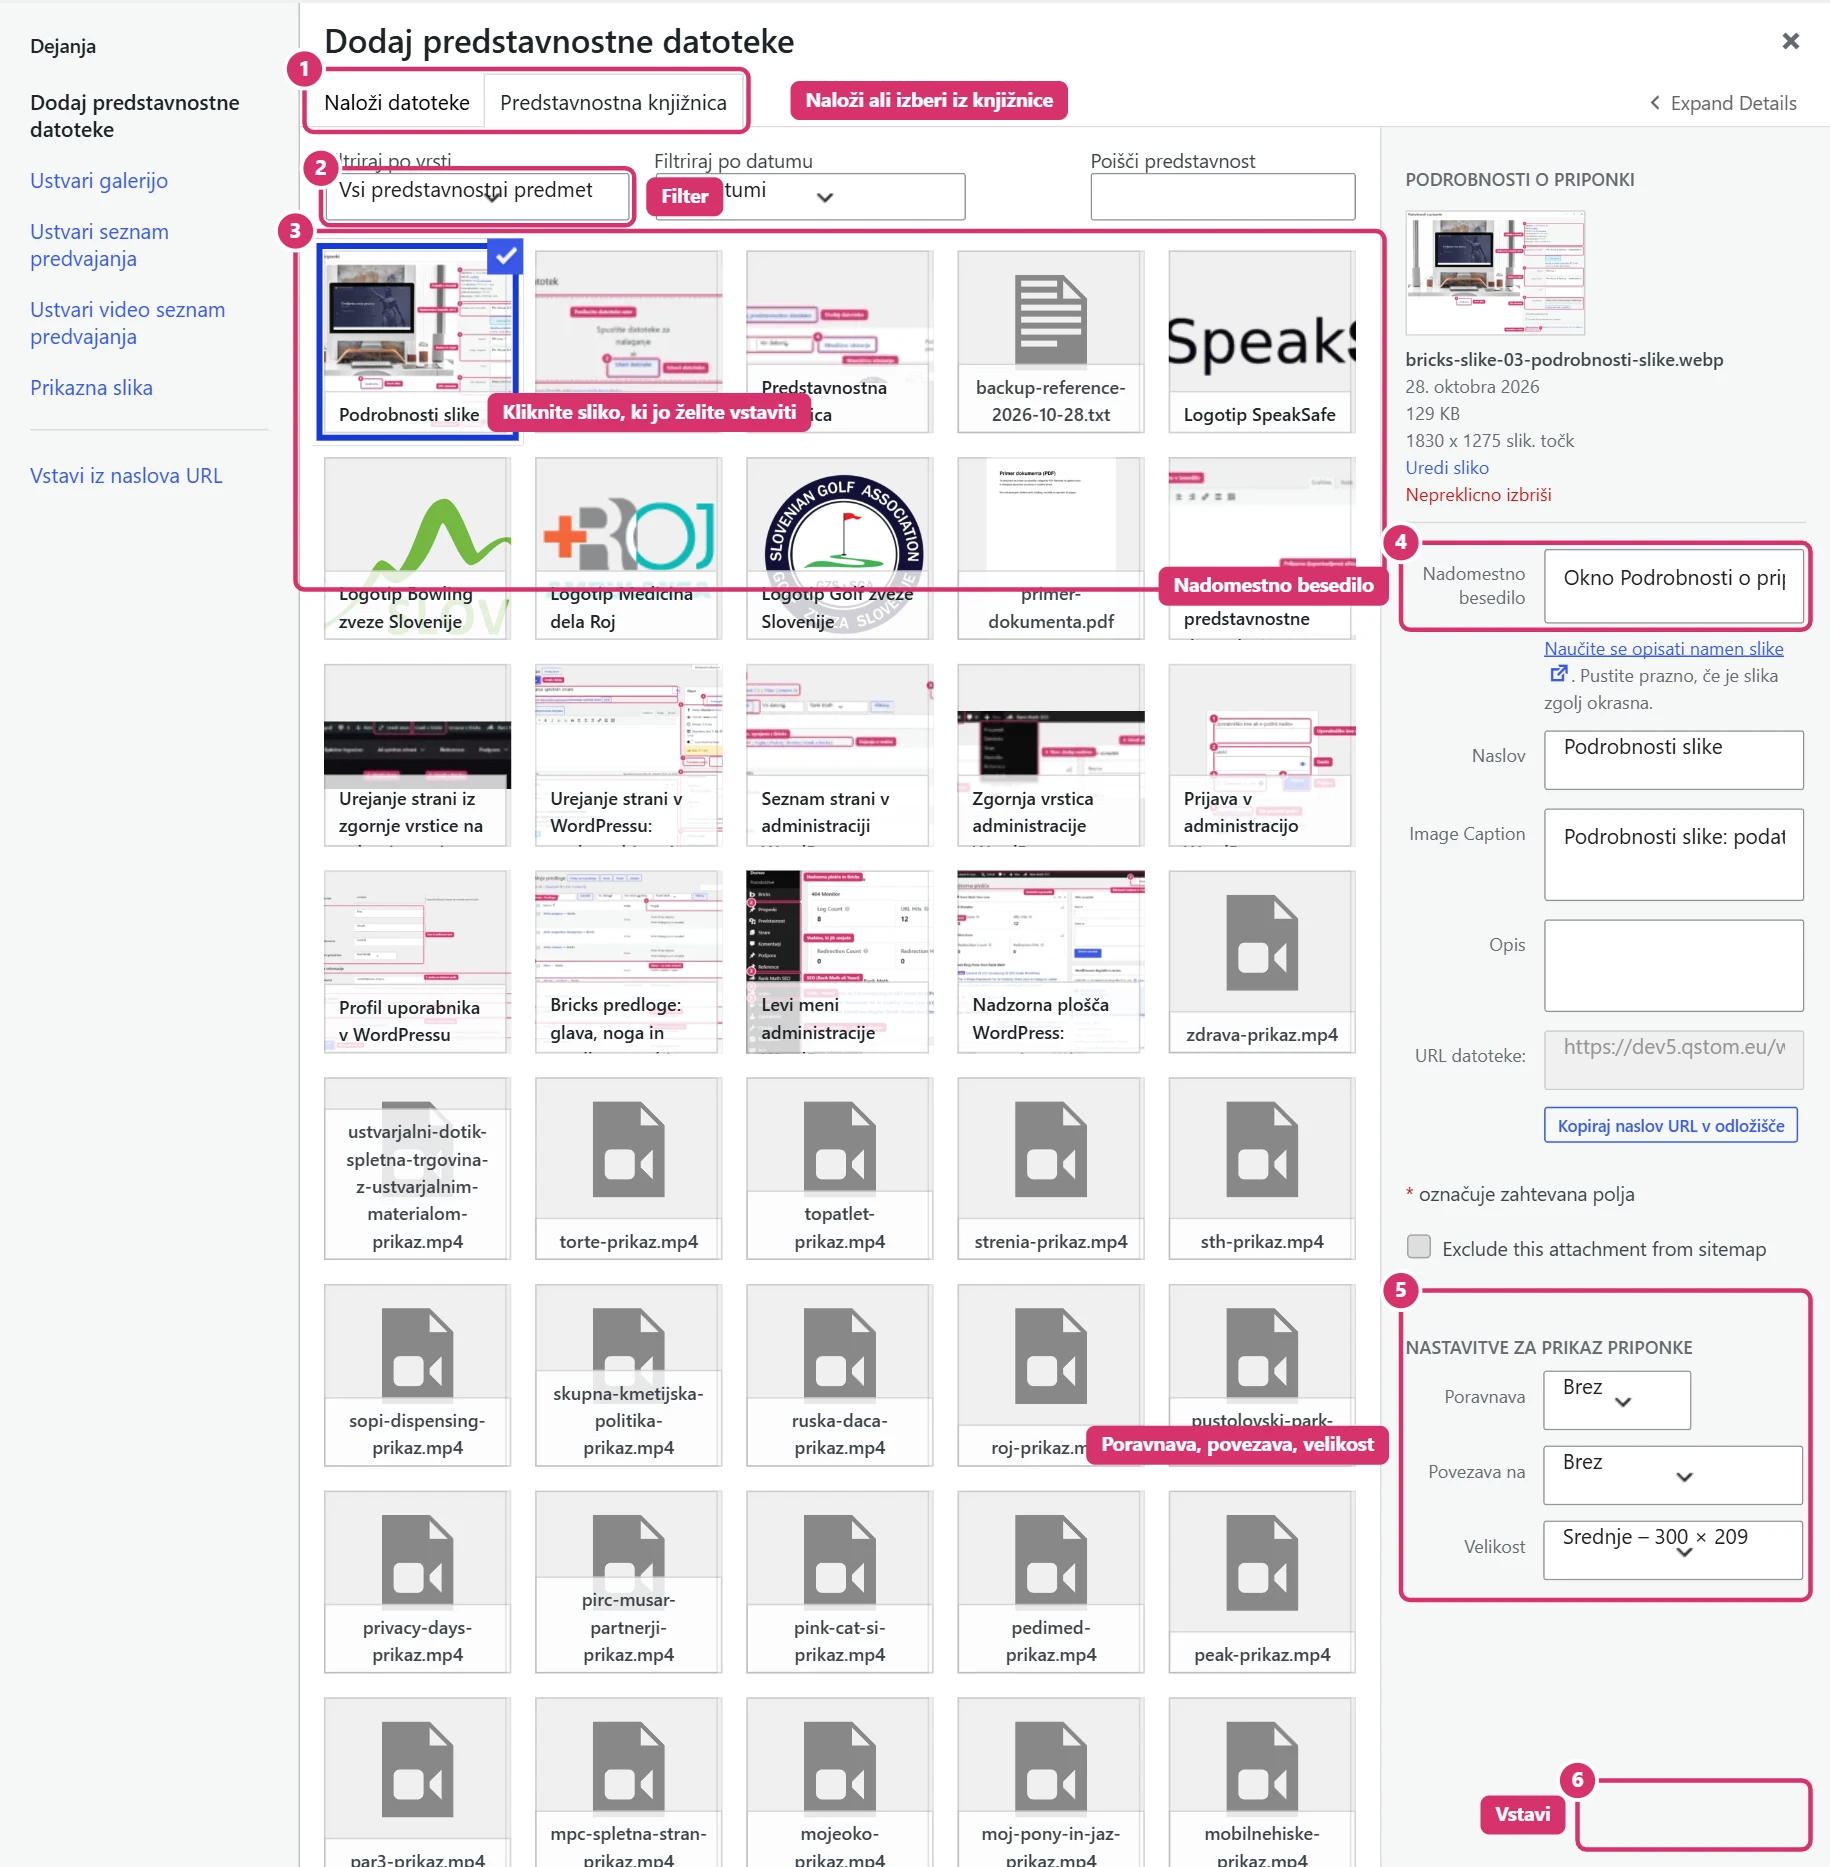
The featured image represents a post, page or product in lists (e.g. on the blog or in an archive), when shared on social networks, and as the main image for products. Set it in the box on the right under Featured Image → Set featured image, choose the image and click Set featured image. Replace it by clicking the image, and remove it with Remove featured image.
The recommended aspect ratio for a featured image is landscape (e.g. 1200 × 630 px), so it also looks good when shared on Facebook or LinkedIn. For products, use the same background and aspect ratio for all products.
7. PDF documents and download links
Upload price lists, catalogues, data sheets or terms as PDFs just like images. Add them to text as a link:
- In the editor, click Add Media and choose the PDF (the Documents).
- Check the Title – this will be the link text (e.g. Price list 2026 (PDF)).
- Under Link To choose Media File.
- Click Insert into post. A link appears in the text that opens or downloads the PDF.
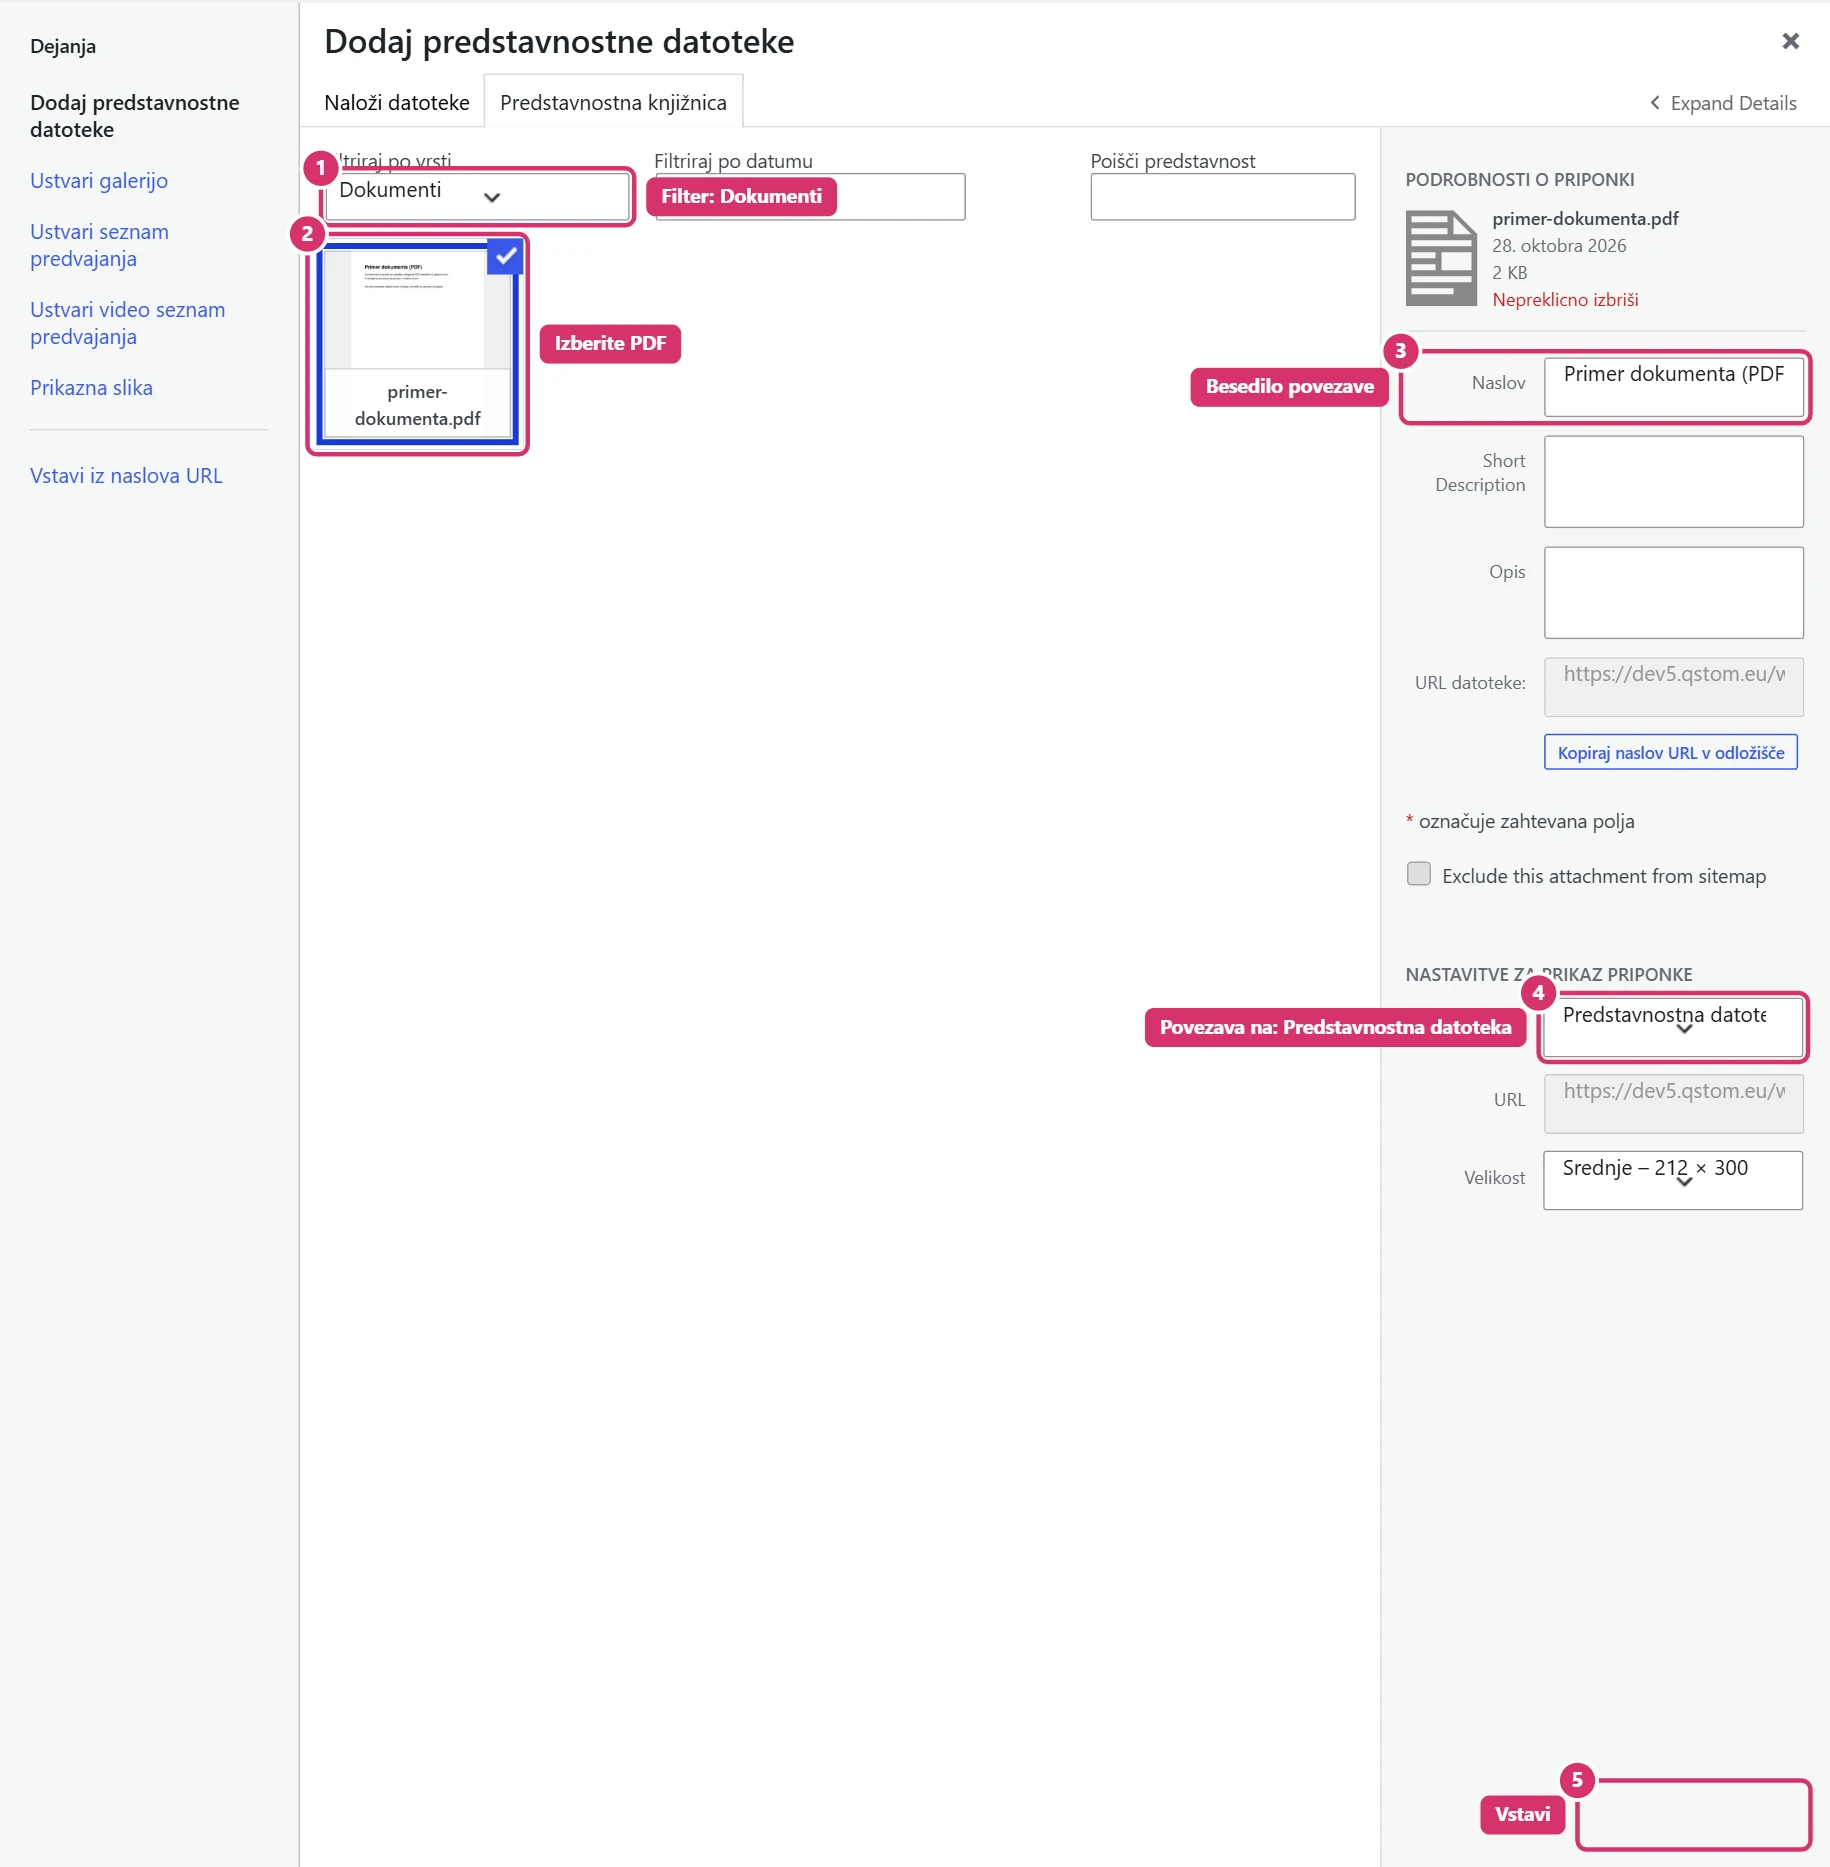
You can also make the link manually: copy the File URLfrom the file details, select the words in the text and click the link icon. Give the PDF a descriptive name (e.g. price-list-2026.pdf) and keep it as small as possible (up to a few MB).
Updating a document: when a new version comes out (e.g. a new price list), upload the new file and replace the link in the text. Only delete the old file once it isn’t linked anywhere.
8. Deleting and editing files
- Deleting from the library is permanent – the file is removed from the server straight away, not moved to the bin. An image that was added to text will no longer show on the page.
- Before deleting a file, check the list view’s Uploaded tocolumn; the file may also be used elsewhere (e.g. in Bricks or on another page).
- Images used by Bricks (section backgrounds, home page images, the logo) are replaced in Bricks. If you upload an image with the same name again, it gets a new name (e.g.
-1) and isn’t replaced automatically. - It’s better to publish videos on YouTube and embed them on the page with a link; uploading large videos directly slows the website down and puts a load on hosting.