
The WordPress admin (wp-admin) is the back end of your website, where you edit pages, posts, images, the menu and, for online stores, products and orders. Bricks is the builder that sets how this content is displayed. In this guide, you’ll learn about logging in, the dashboard, the toolbar and the left menu, the common rules for content lists and publishing, and the difference between editing in WordPress and in Bricks.
In short: the basics in 6 steps
- Log in at your-website.com/wp-admin.
- After logging in, the Dashboardopens; the menu is on the left and the toolbar at the top.
- You edit content in the left menu: Pages, Posts, Media (and, for stores, Products).
- In a content list, hover over a row and click Edit or Edit with Bricks.
- Save your changes with the Update (or Publish) button and check them on the website.
- When you’re done, log out: Howdy, (name) → Log Out.
1. Logging in to the admin
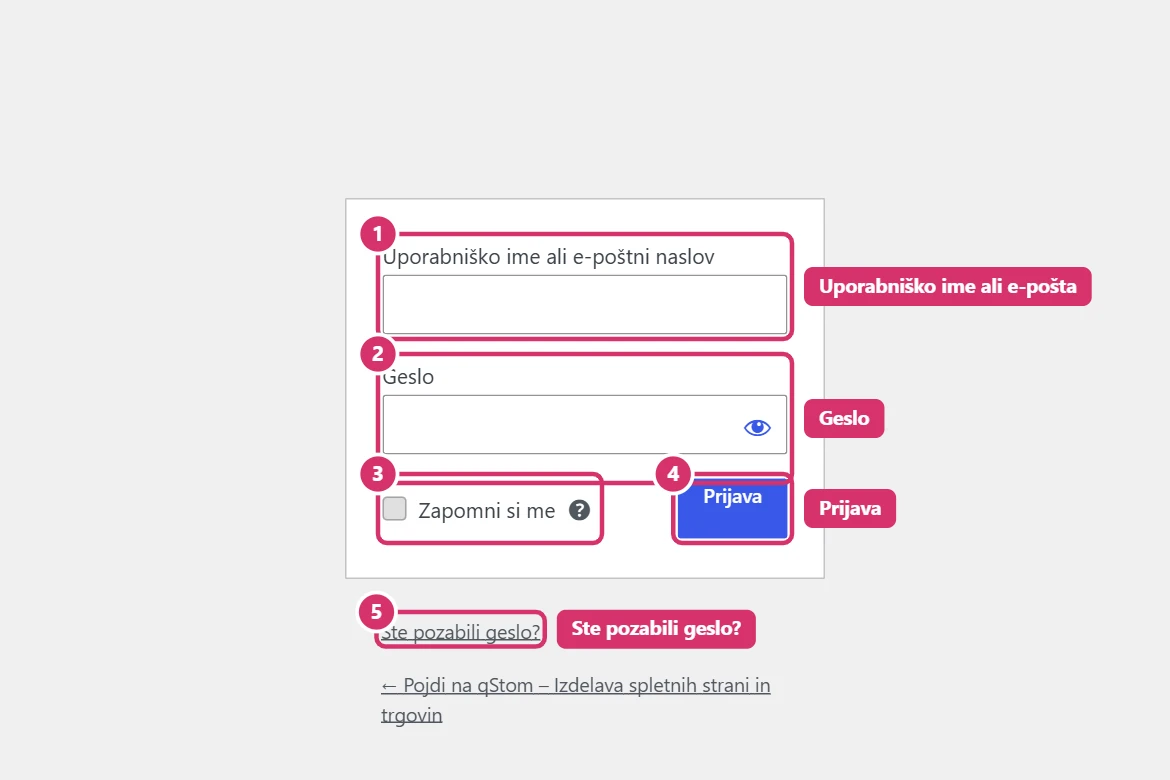
Open your website’s address and add /wp-admin (e.g. www.your-website.com/wp-admin). The login page may be designed with your logo, but the fields are always the same:
- Username or Email Address – you can enter either.
- Password – the eye icon shows the password you typed, so you can check it.
- Remember Me – only tick this on your own computer, never on a shared or public one.
- Lost your password? – you’ll get an email with a link to set a new password (check your spam folder too).
2. Dashboard
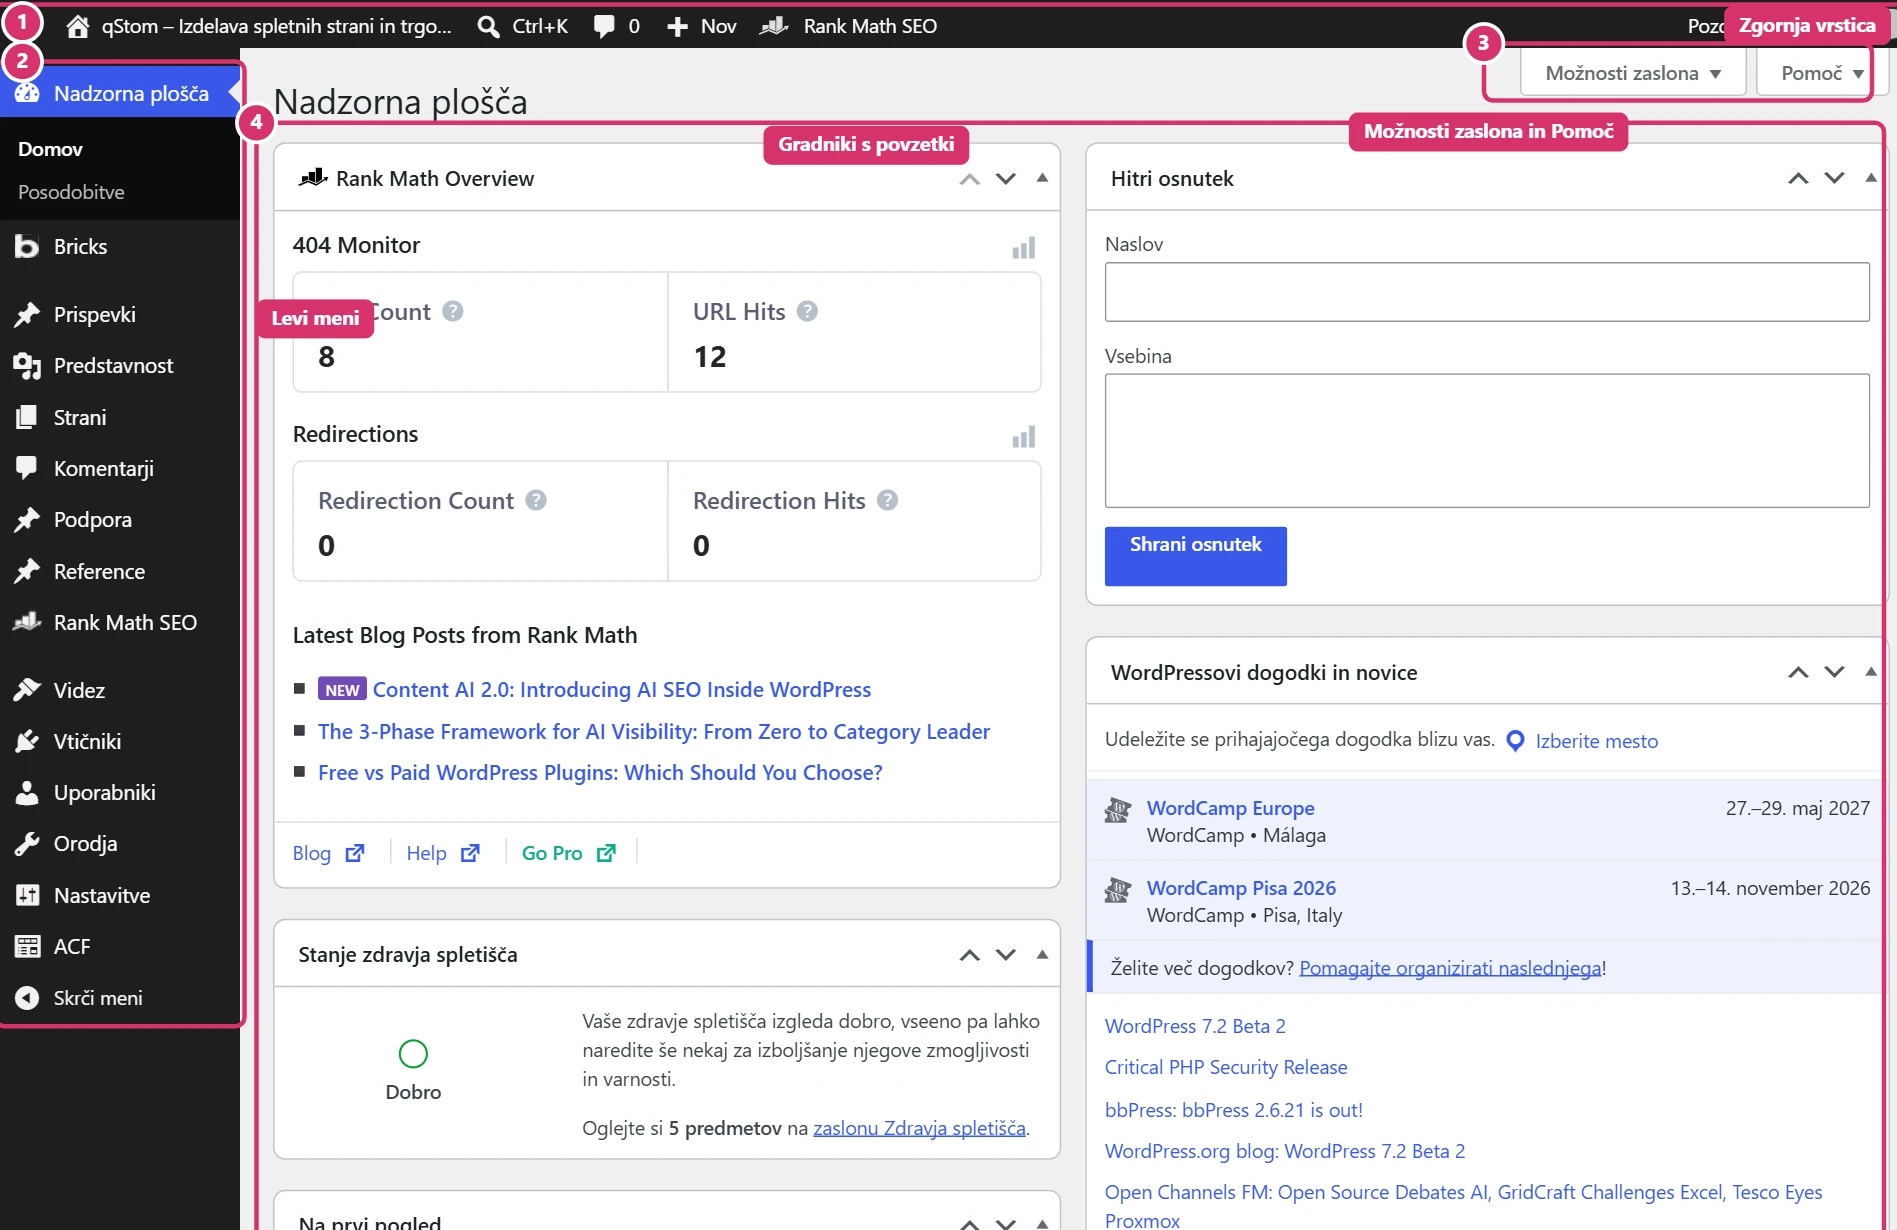
The dashboard is the first screen after you log in. It has four parts:
- Toolbar – shortcuts to the website, new content and your profile (section 3).
- Left menu – every part of the admin (section 4).
- Screen Options and Help – choose which widgets or columns are shown. The setting only applies to your account.
- Widgets – summaries, e.g. At a Glance (number of posts and pages), Quick Draft, site health and SEO. For online stores, there’s also a sales and orders summary.
Plugin notices (e.g. about updates) sometimes appear at the top of screens. Most are meant for us as website administrators. If a notice asks you to do something (e.g. “update the database”), don’t confirm it yourself – send us a screenshot.
3. Toolbar
The toolbar is visible on every admin screen and also on the website while you’re logged in:
- Website name – opens the website as visitors see it.
- Ctrl+K – the command palette: type a screen name (e.g. “menus”) and open it without searching the menu.
- + New – quick add: post, media, page, user and, for stores, product, order and coupon.
- Howdy, (name) – Edit Profile and Log Out.

When you’re viewing the website while logged in, the toolbar also has the Edit Page (opens editing in the admin) and Edit with Bricks (opens the page in the builder) buttons. This is the quickest way to edit the page you’re looking at.

4. Left menu: what you edit and what you leave alone
The left menu contains every part of the admin. Hover over an item to open its submenu; with Collapse Menu at the bottom you show icons only. The items vary a little between websites (e.g. custom content types, or WooCommerce for stores).
- Posts – news and articles (blog), categories and tags.
- Media – library of images, PDF documents and other files.
- Pages – the website’s pages (Home, About us, Contact, etc.).
- Custom content – e.g. projects, guides; for stores, Products and WooCommerce (orders, customers, coupons).
- SEO (Rank Math or Yoast SEO) – titles and descriptions for Google, redirects.
- Appearance → Menus – editing the main menu (guide to editing the menu).
- Bricks – templates (header, footer, etc.) and builder settings – section 7.
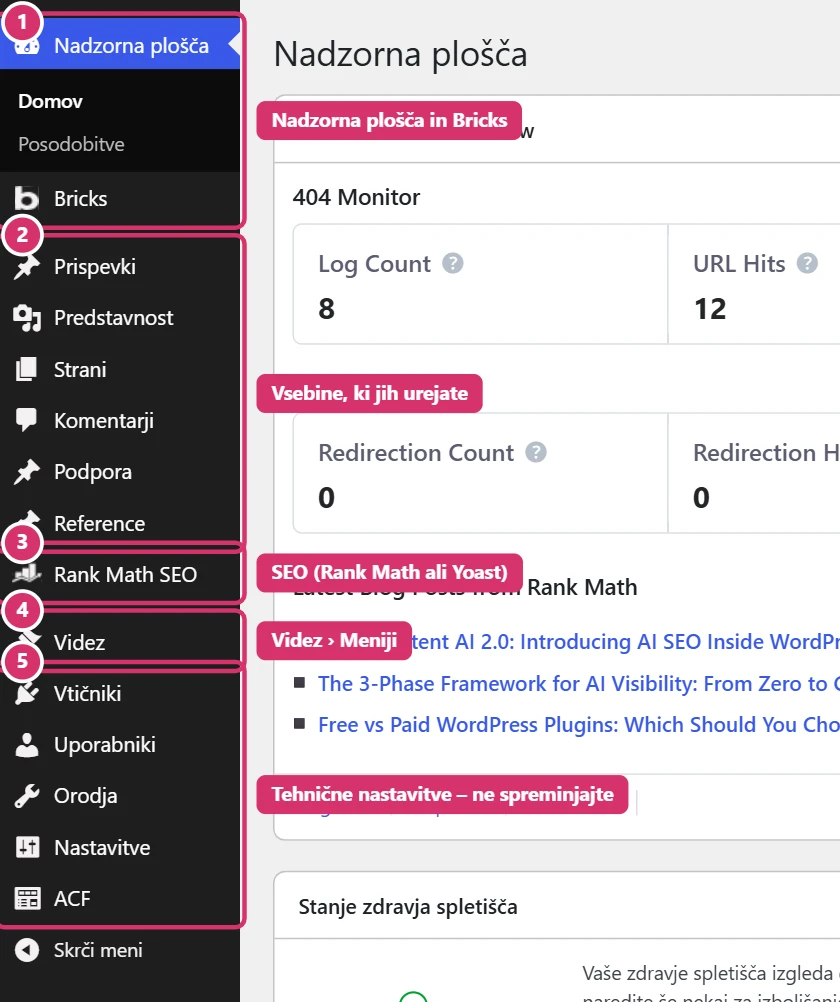
Don’t change technical settings without checking with us first:
- Plugins – deactivating or deleting a plugin can stop forms, the store or payments working.
- Appearance → Themes and file editors – changing the theme or files breaks the website’s look.
- Settings → Permalinks – a change alters the addresses of all pages (404 errors, lost Google rankings).
- Bricks → Settings, ACF, Tools and store settings.
- Updates to WordPress, plugins and the theme – we do these after making a backup.
If your role is Editor or Shop Manager, you won’t see some of these menus – that’s intended and protects you from accidental changes.
5. Content lists: search, views and actions
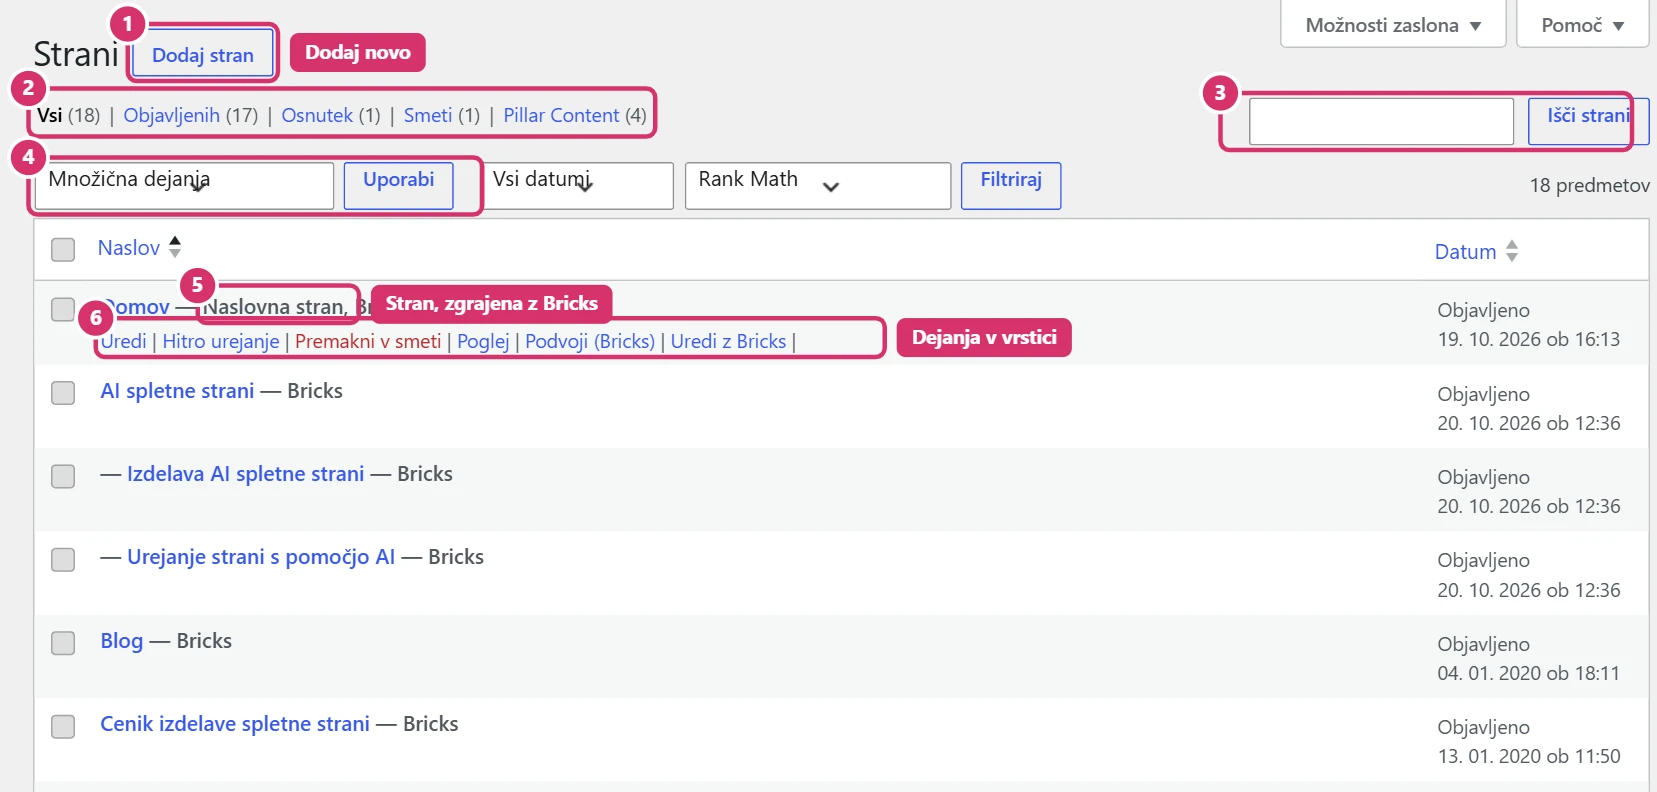
The lists of pages, posts, products and orders all work the same way, so once you know one, you can use them all:
- Add New – new content.
- Views by status – All, Published, Drafts, Bin; the number in brackets is the number of entries.
- Search – by title and content (for products, also by SKU).
- Bulk actions – for all entries you’ve ticked: e.g. Bulk edit or Move to Bin; confirm with Apply.
- — Bricks next to the title – the page is built in Bricks; edit its content with Edit with Bricks.
- Row actions – appear when you hover over a row: Edit, Quick Edit (title, URL, status without opening the page), Move to Bin, View, Duplicate and Edit with Bricks.
Content in the Bin is no longer visible on the website and is permanently deleted after 30 days; until then, you can restore it with Restore. A deleted page or product returns a 404 error and loses its Google ranking, so if you don’t need content for a while, set it to Draft.
6. Editing, saving and publishing
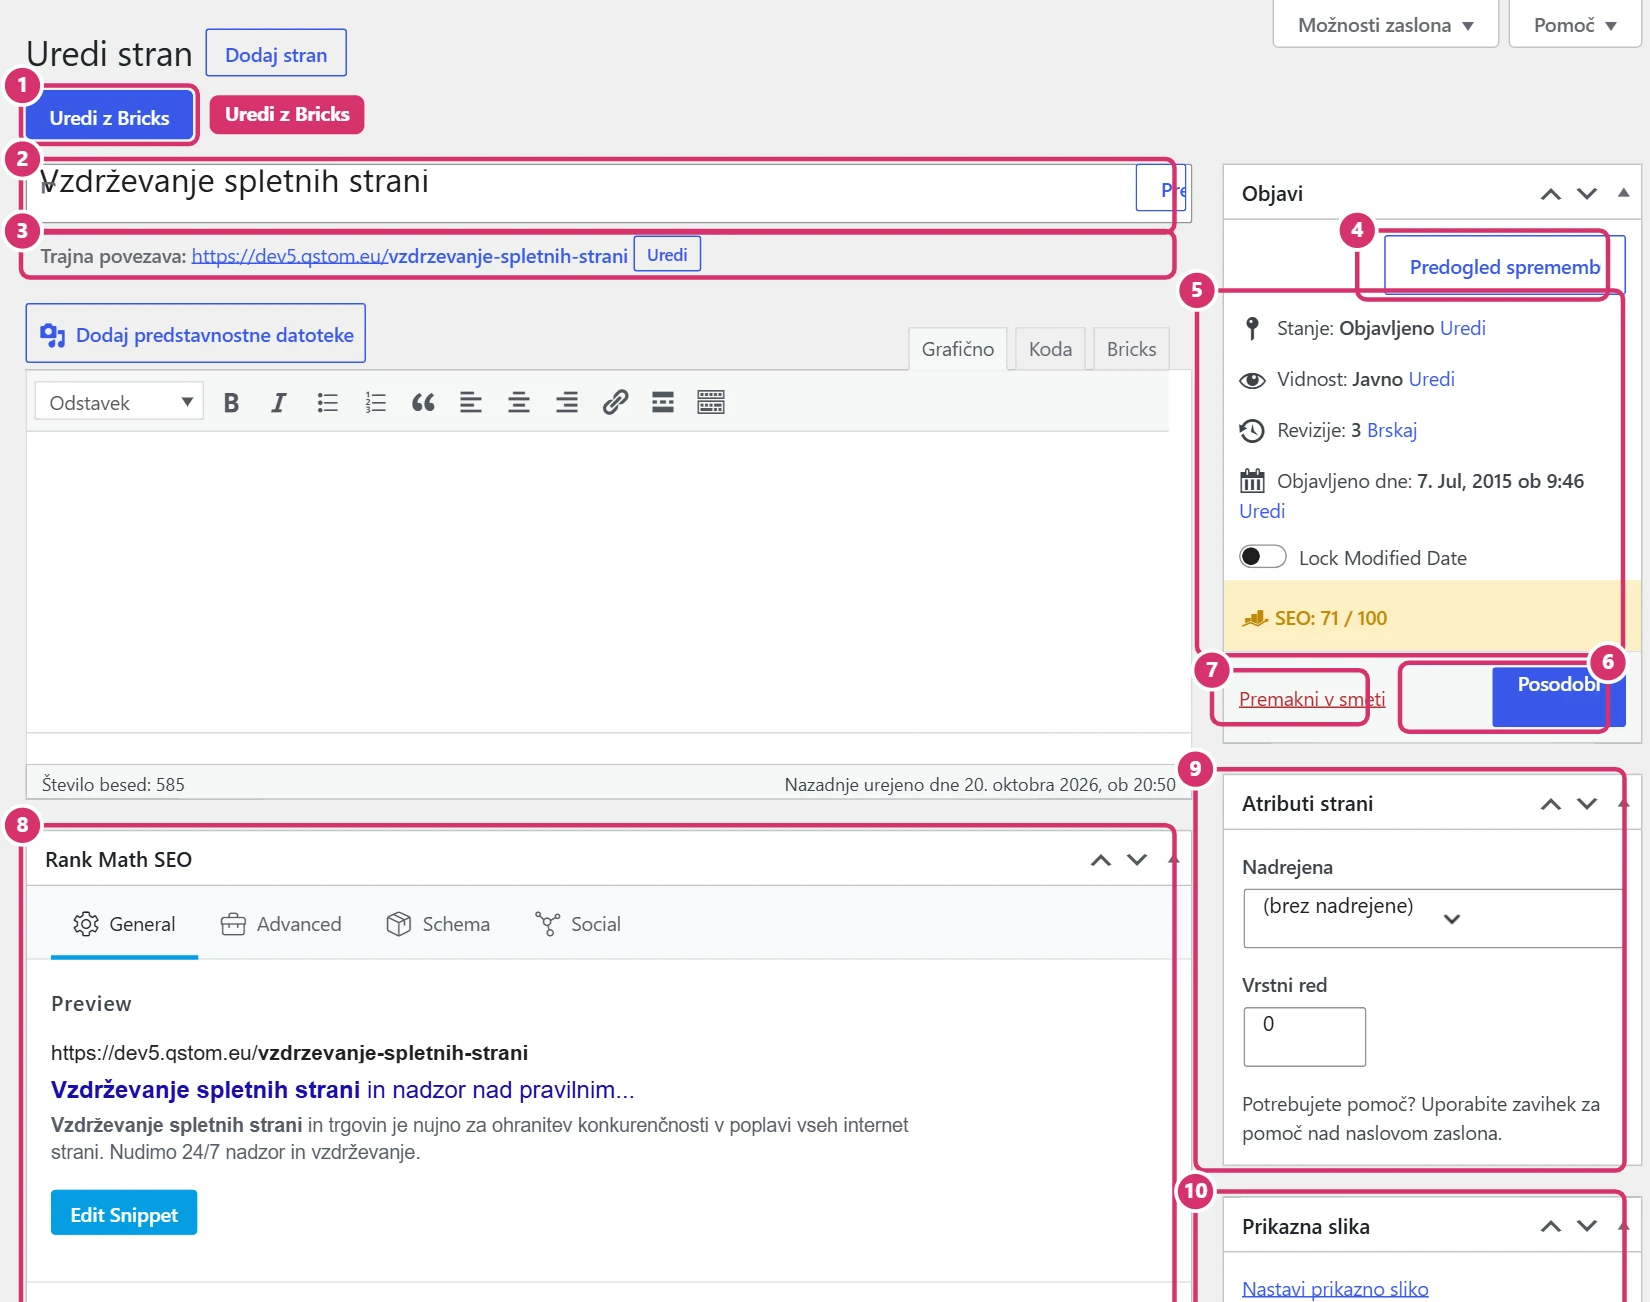
The editing screen for pages, posts and products is laid out similarly: on the left are the title, editor and extra fields, and on the right the Publish box and settings.
- Edit with Bricks – opens the page in the builder (section 7).
- Title and Permalink – the content’s title and its URL. For new content, the URL is created from the title; use Edit to shorten it (lower case, no accented letters, hyphens).
- Preview Changes – opens unsaved changes in a new tab; visitors can’t see them yet.
- Status, Visibility, Revisions, Published on – draft or published, public or private, previous versions and the date. A future date means scheduled publishing.
- Update / Publish and Move to Bin.
- SEO – title and description for Google, and the focus keyphrase.
- Page Attributes (parent page, order) and Featured Image (the image for sharing on social networks and in lists).
How to save:
- Edit the title, content and fields.
- Click Preview Changes and check how it looks.
- Click Update (or Publish) and wait for the notice that the content has been updated.
- Open the page and refresh it; if you don’t see the changes, refresh without the cache (Ctrl+F5 or Command+Shift+R).
If you change the permalink of content that’s already published, the old address returns a 404 error. The old address needs a 301 redirect – let us know about the change.
7. WordPress or Bricks – where do I edit what?
WordPress stores the content (text, images, products, prices), and Bricks sets how it’s displayed. You’ll do most of your work in WordPress:
- Posts, products, guides – edit them in the admin (Edit); their look is set by a Bricks template, the same for all entries of that type.
- Designed pages (Home, services, Contact, etc.), marked with — Bricks – edit their text and images with Edit with Bricks.
- Extra fields below the editor (e.g. FAQs) – fill them in like normal fields; Bricks shows them in the right place.
- Menu – Appearance → Menus.
- Header, footer and templates – Bricks → Templates; we edit these by agreement.
In Bricks → Templates holds the shared parts of the website. The Conditions column shows where a template applies: the header and footer on the entire website, the post template on all posts, and so on.
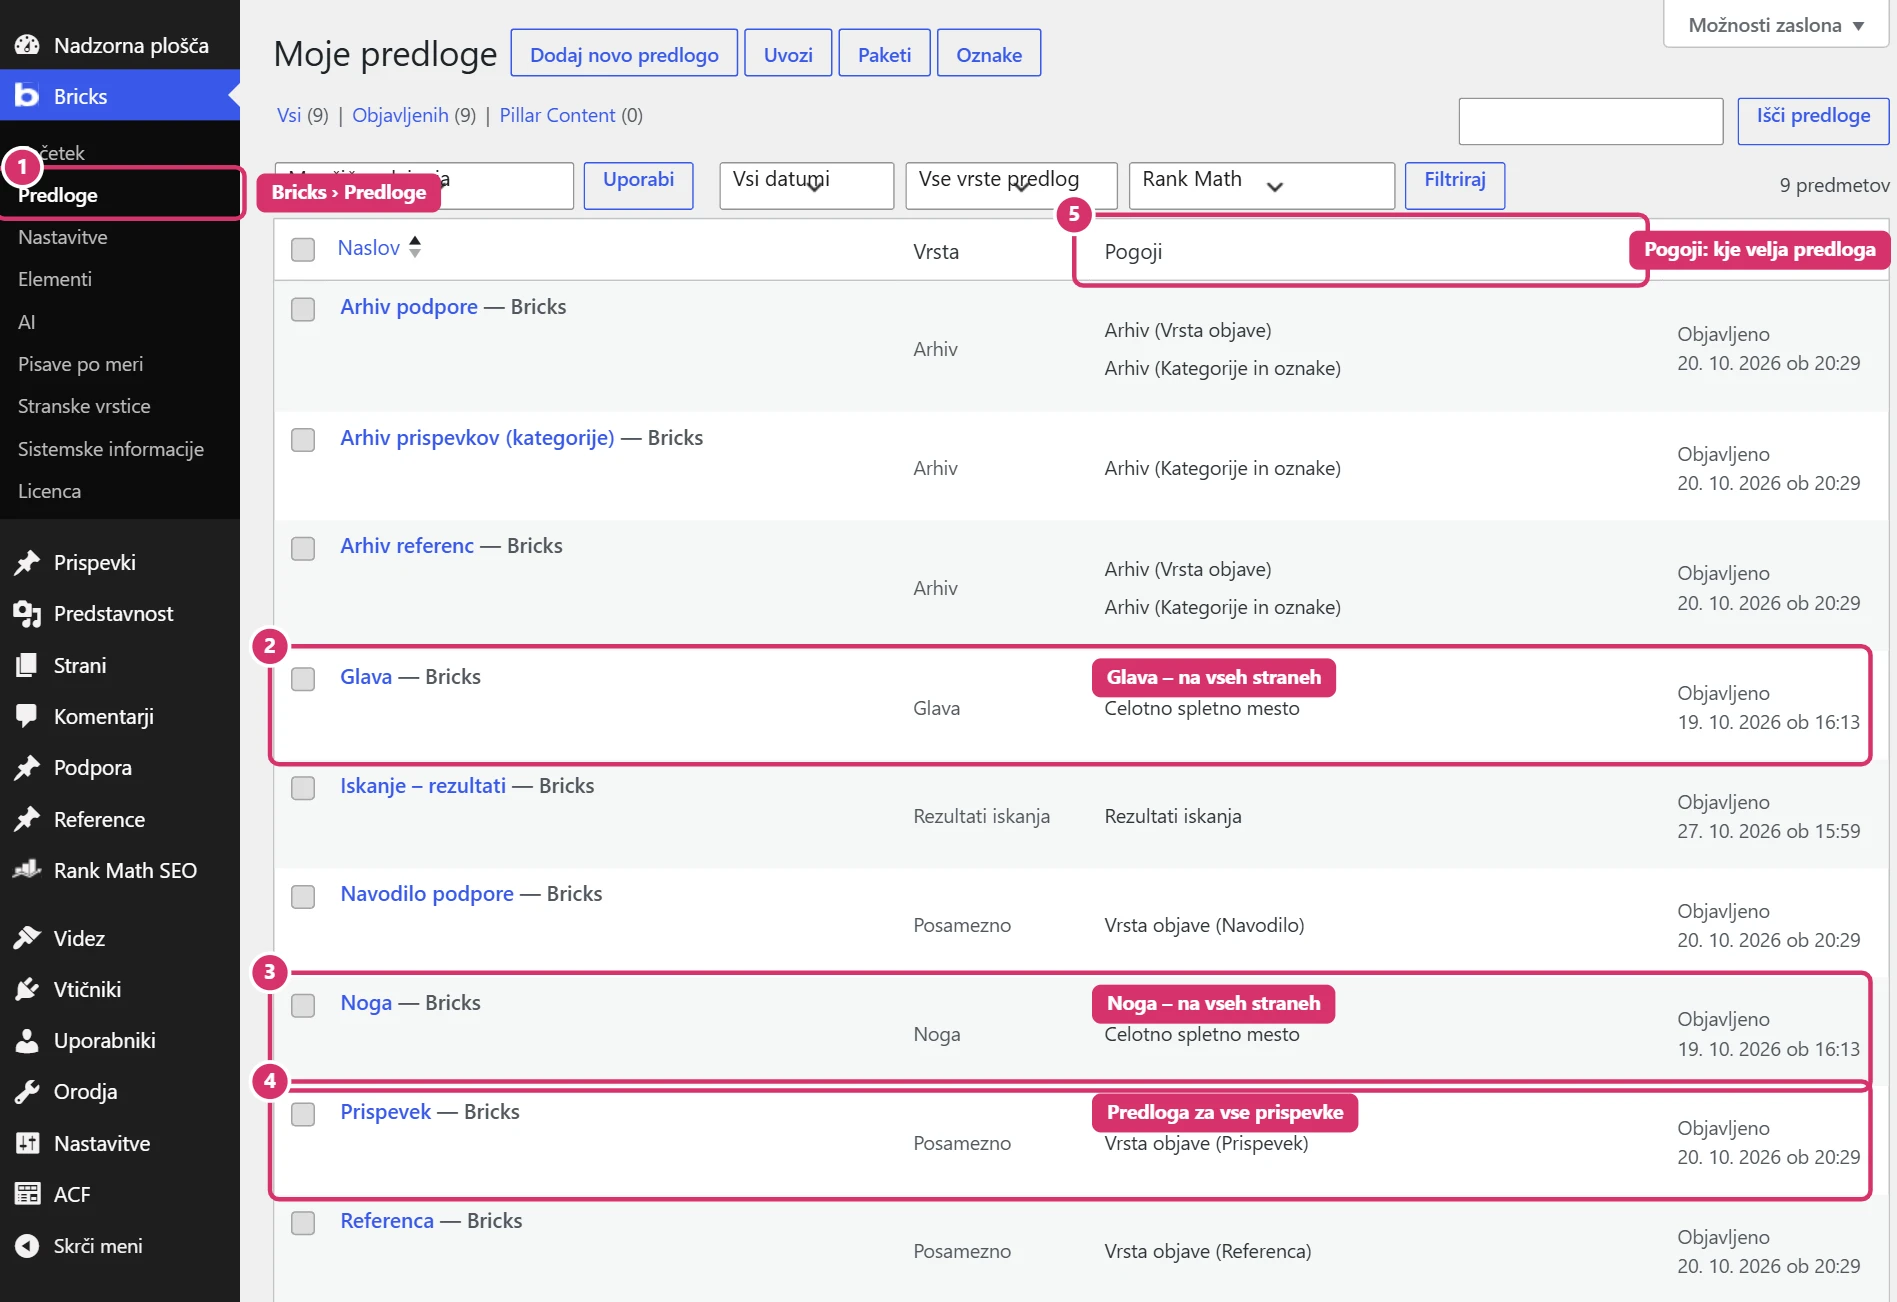
A change to a template shows instantly on every page where it applies. Don’t edit or delete templates or change their conditions without checking with us. Bricks creates a revision every time you save, so we can fix any mistakes.
8. Profile and password
Open your profile under Users → Profile or in the toolbar under Howdy, (name) → Edit Profile.
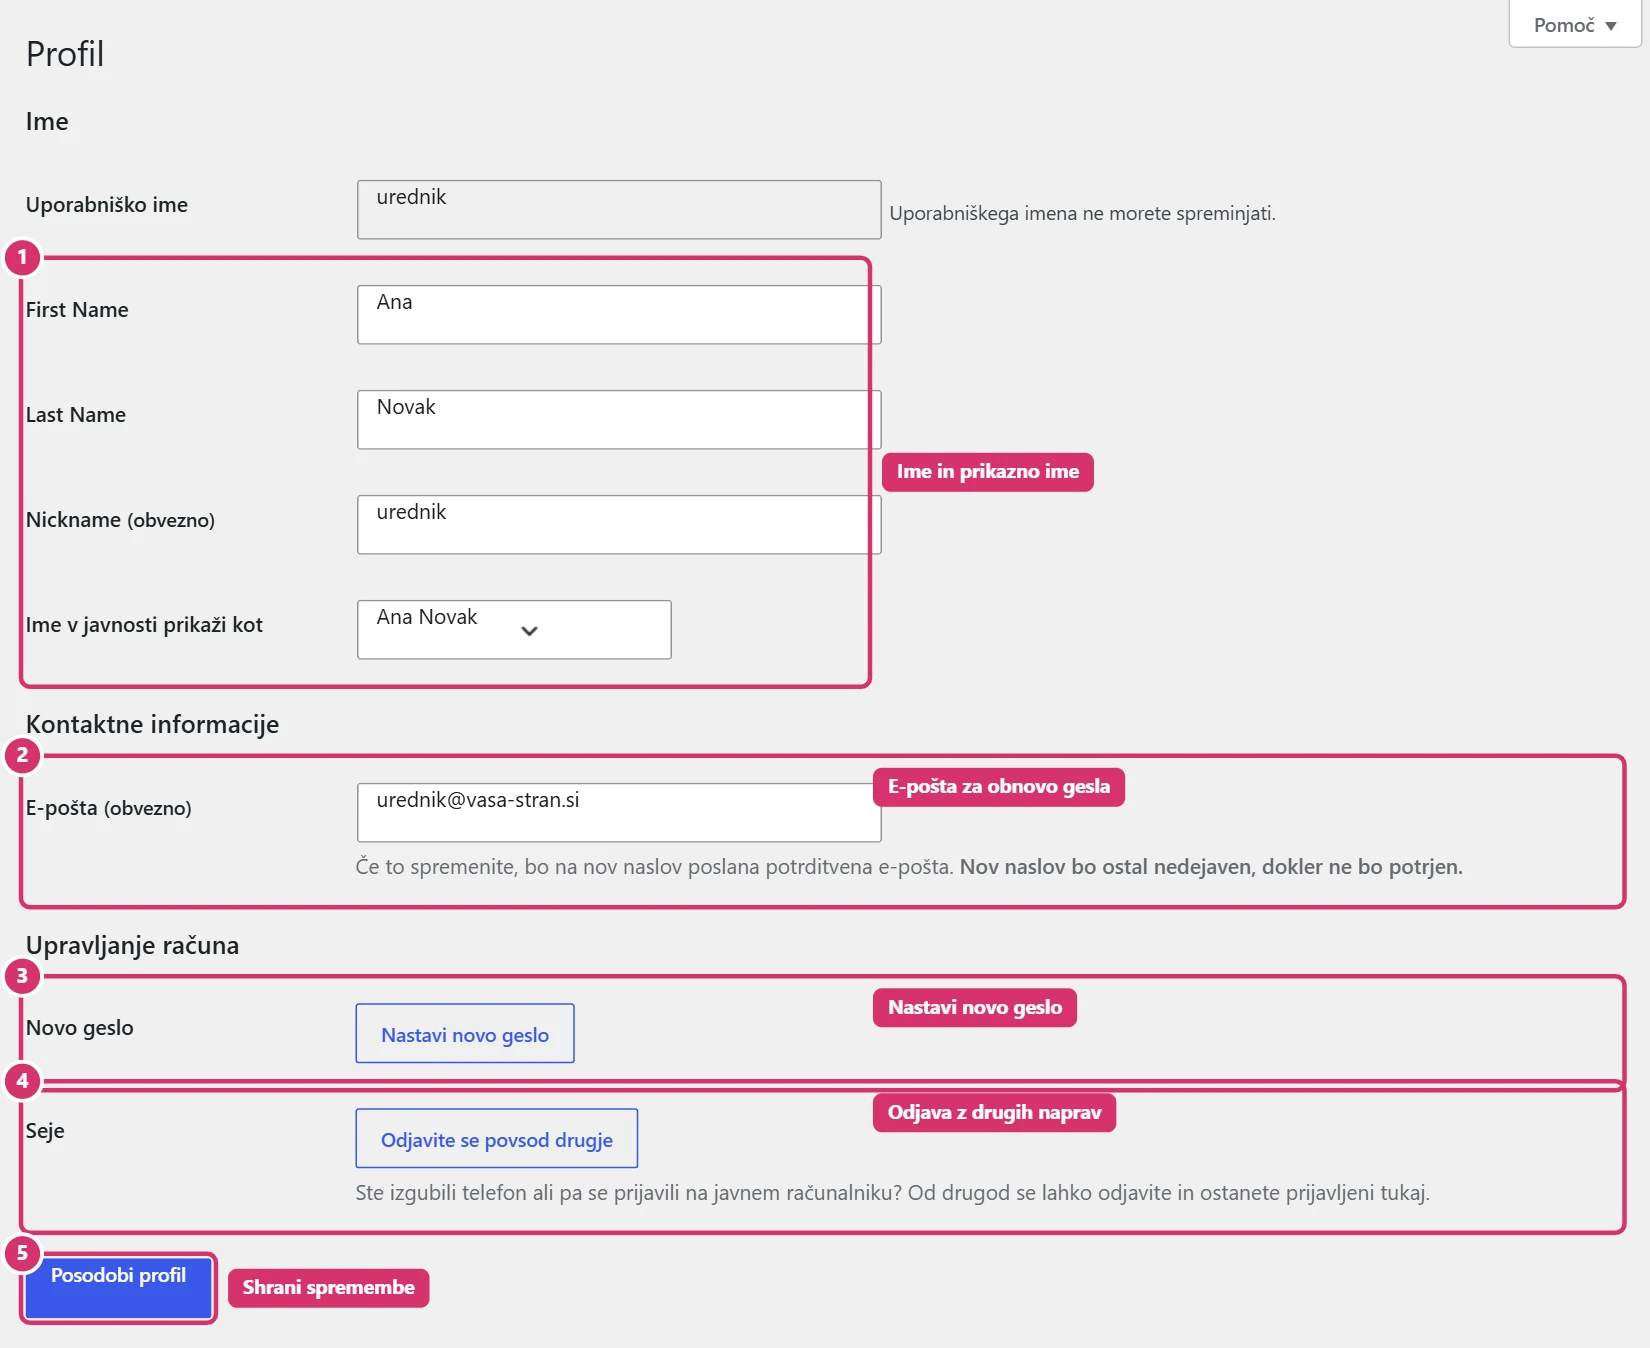
- First name, last name and display name – the username can’t be changed; Display name publicly as sets the byline under posts.
- Email – the lost-password link is sent here. You need to confirm a new address with the link in the email.
- Set New Password – suggests a strong password; you can enter your own (at least 12 characters, upper and lower case letters, numbers and symbols).
- Log Out Everywhere Else – logs your account out on all other devices (e.g. a lost phone).
- Update Profile – saves your changes.
9. Logging out and safe use
- To log out: in the toolbar, choose Howdy, (name) → Log Out. Always log out on shared and public computers.
- Each user has their own account. Don’t share passwords or send them by email; we’ll set up a new account for a colleague.
- If you suspect someone else has used your account: click Log Out Everywhere Else, change your password and let us know.
- Don’t install plugins or upload files from unknown sources.